Kindly follow the step-by-step approach mentioned below for customizing mobile templates for a BigCommerce online store:
Kindly follow the step-by-step approach mentioned below for customizing mobile templates for a BigCommerce online store:
Hello Folks,
Today, I am going to explain the process to customize mobile templates in BigCommerce. The process that I am going to explain is applicable specifically to the stores using BigCommerce mobile themes (theme named Blueprint).
Kindly follow the step by step approach as mentioned below for the customization:
1. Enabling the Mobile Theme
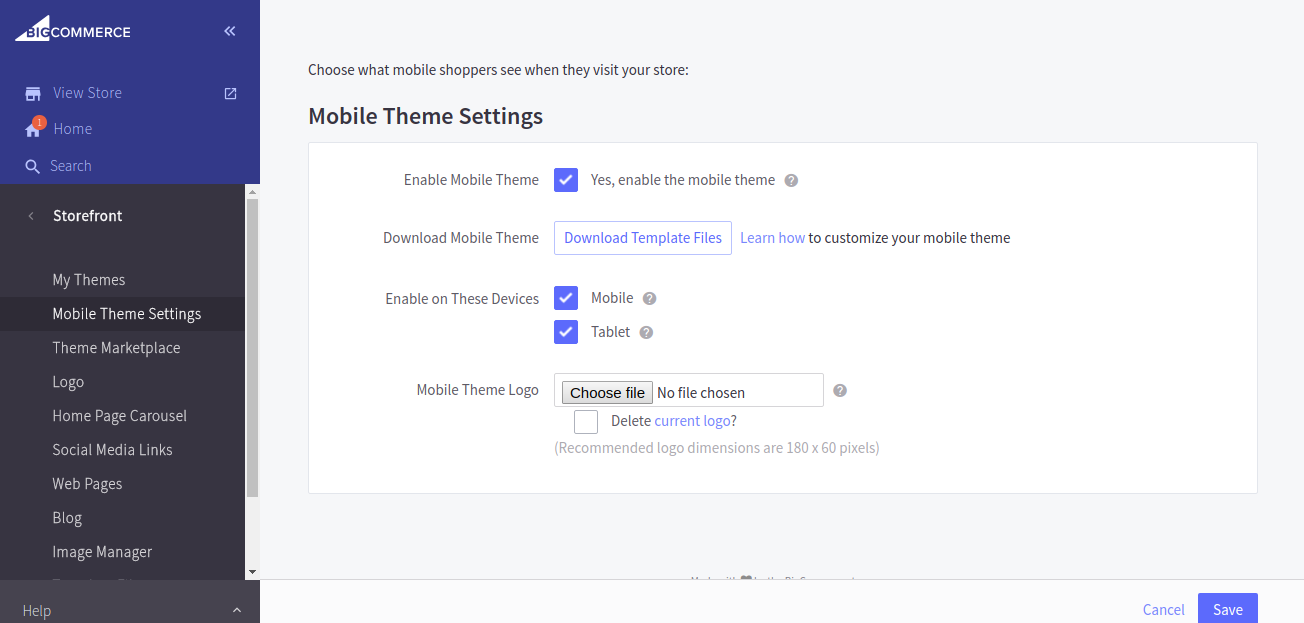
To enable the mobile theme, go to Storefront › Mobile Theme Settings and check the box marked “Yes, enable the mobile theme”.
Once Enable the mobile theme option is checked, the Download Mobile theme option will appear.

Download mobile theme — Download your mobile theme’s template files so that you can customize and upload them, again.
Enable on these devices — This option allows you to select which type of mobile devices your mobile theme should be used for.
Mobile — Displays the mobile theme when customers are shopping from an Apple iPhone/iPod Touch, Android phone or Windows 8 Phone.
Tablet — Displays the mobile theme when customers are shopping from an Apple iPad, Android Tablet or Windows 8/RT tablet.
Mobile theme logo — Click choose a file to upload a mobile-specific version of your logo to be used when customers are shopping from mobile devices.
2. Customizing the Mobile Theme: Downloading the mobile template
1. Go to Storefront › Mobile Theme Settings.
2. Enable Mobile Theme option
3. Click Download Template Files. Your mobile theme files will be downloaded in a single .zip file.
4. Create a new folder on your desktop and name it BigCommerce Mobile Theme Files.
5. Move the downloaded .zip file to the new folder on your desktop and unzip the file using a program like 7-Zip or WinZip.
Making changes
Customizing the BigCommerce mobile theme requires making changes to the HTML and CSS files on your computer using a plain text editor.
Uploading your changes
For uploading the mobile template file, we have to connect WebDAV.
WebDAV Setup Details:
In your control panel, go to Server Settings › File Access (WebDAV), and copy the WebDAV Username and Password.

Here are the steps to access WebDAV:
1. In your control panel, go to Server Settings › File Access (WebDAV) and click Download. A Cyberduck connection file will be downloaded on your computer.
2. Open the downloaded file. It will automatically open a connection to your store’s server in your WebDAV client.
3. Upload any customized files to the mobile_template directory. Make sure that you follow the same template structure as the one in the file you originally downloaded in the ‘Downloading the Mobile Template’ section above.
For example, since default.html exists outside of all of the other folders in the downloaded file, it should be uploaded outside of the folders in WebDAV as well.
Please feel free to ask any questions!
Do share this article with your friends/co-workers if you find it interesting!


