A REST (Representational State Transfer) API allows users to fetch, store and update data on a remote server. REST acts as an interface between systems using HTTP to fetch data and perform operations on fetched data. JSON (Javascript Object Notation) is used for data transfer over the servers.
Methods of REST:
GET – To fetch data from remote servers.
POST – To insert data into the remote server.
PUT – To update the existing data on a remote server.
DELETE – To delete data from the remote server.
Packages to be installed:
a) Express – It is a web application framework for Node JS. It makes web application development faster and easier. It allows creating the REST API server and it can be installed using the command (npm install -g express).
b) JWT – It is used to verify the identity of a person by the server. Unique tokens are generated and given to different users. It can be installed using the command (npm install JWT).
c) JOI – JOI allows us to create schemas for JAVASCRIPT OBJECTS (The objects which store information) to ensure the validation of key information. It can be installed using the command (npm install joi).
d) Mongoose – Mongoose is a Javascript framework that is commonly used in a Node.js application with a MongoDB database. It is an ODM that allows defining objects with a strongly-typed schema. It can be installed using the command (npm install mongoose).
Procedure to be followed:
Step 1: Create a folder for the project.
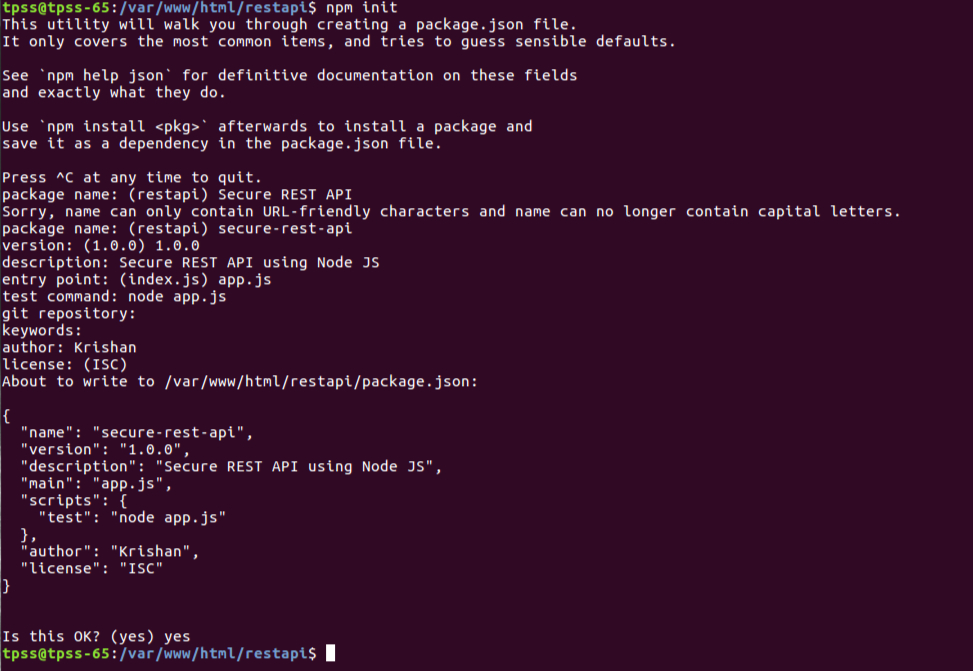
Step 2: Run npm command in it, to create the package.json file as shown below in the screenshot :

Step 3: app.js is the main file. We use the (node app.js) command to run the server.
 var express = require('express'),
 app = express(),
 path = require("path"),
 bodyParser = require('body-parser'),
 port = 5000;
 app.all('*', function (req, res, next) {
 res.set('Access-Control-Allow-Origin', '*');
 res.set('Access-Control-Allow-Credentials', true);
 res.set('Access-Control-Allow-Methods', 'POST, GET, PUT,PATCH, DELETE');
 res.set('Access-Control-Allow-Headers', 'Content-Type, Authorization, authorization- key,token');
 if ('OPTIONS' == req.method) return res.status(200).send(); next(); });
 const server= require('http').createServer(app);
 require("./../config/database")(app); //Database connection
 server.listen(port);
 console.log('RESTful API server started on: ' + port);
Note: The headers shown in bold are used for cross-domain requests. These are also known as CORS (Cross-Origin Resource Sharing). It enables CORS for all resources on your server. This can also be used for resource files.
Step 4: Create a folder named ‘models’ in your project and then create the User Schema in “userModel.js” file at the given path (/var/www/html/restapi/models) as shown in the code given below:
module.exports = function (mongoose) {
var Schema = mongoose.Schema,
validation = require("./validationModel"),
UserSchema = new Schema({
 firstName: {
  type: String,
  trim: true,
  required: "First name cannot be blank"
 },
 lastName: {
  type: String,
  trim: true,
  required: "Last name cannot be blank"
 },
 password: {
  type: String,
  trim: true,
  required: "Password cannot be blank"
 },
 email: {
  type: String,
  lowercase: true,
  trim: true,
  unique: true,
  required: "Email address is required",
  validate: [
   validation.validateEmail,
   "Please fill a valid email address"
  ]
 },
 created: {
  type: Date,
  default: Date.now
  },
});
mongoose.model("users", UserSchema);
};
Now we can use this model to insert and update data into the database.
Step 5: Create a folder named routes in your project. Now write the GET, POST, PUT, PATCH functions in the “userRoutes.js” file. These functions allow users to insert and update data into the database.
'use strict';
module.exports = function(app) {

 const users = require('../controllers/users.controller');
 const jwtAuth = require('../middleware/jwt');
 const validator = require('../middleware/schema-validator');
 const headerValidator = require('../middleware/header-validator');

 const loginSchema = {
   email: Joi.string().required(),
   password: Joi.string().required()
  };
 app
  .route('/users')
  .post(headerValidator.authKey, headerValidator.contentType, auth.isAuthenticated, users.create)
  .put(headerValidator.authKey, headerValidator.contentType, auth.isAuthenticated, headerValidator.token, validator(loginSchema),users.login, jwtAuth.encode, users.getProfile)
  .patch(headerValidator.authKey, headerValidator.contentType, auth.isAuthenticated, headerValidator.token, jwtAuth.decode, users.update);
};
Step 6: JSON Web Token is a JSON-based access token used for authentication. For example, a server could generate a token for admin and provide that to a client. The client could then use that token to prove that it is logged in as an admin. (middleware/jwt.js file)
const errorHandler = require("./../controllers/errors.controller");
const jwt = require('jsonwebtoken');
const message = require("../message/index");
const view = require("../view/responseDTO");
//  JWT Token encode
module.exports.encode= function(req, res, next) {
jwt.sign({ userId: res.userinfo._id },message._jwtsecret, function(err, encode) {
     if (err) {
       view._view(
         {
           code: 400,
           flag: message._flag.params.flag,
           message: errorHandler.getErrorMessage(err)
         }, res, next );
     } else {
       res.token = encode;
       next();
     }
   }
 );
};

//  JWT Token Decode
module.exports.decode= function(req, res, next) {
jwt.verify(req.headers["token"], message._jwtsecret, function(err, decoded) {
       if(err){
       view._view(
         {
           code: 400,
           flag: message._flag.params.flag,
           message: errorHandler.getErrorMessage(err)
         }, res, next);
       }else{
         res.userId = decoded.userId;
          next();
       }
});
};
Step 7: JOI allows you to create blueprints or schemas for JavaScript objects (an object that stores information) to ensure the validation of key information(middleware/schema-validator.js).
//schema validator
const Joi = require('joi');
const view = require("../view/responseDTO");
module.exports = (schemaObject) => {
    return (req, res, next) => {
        const payload = Object.assign({}, req.params || {}, req.query || {}, req.body || {});
        Joi.validate(payload, Joi.object().keys(schemaObject), (err, result) =>{
            if(err){
                view._view({
                    code: 400,
                    errors:err.details
                }, res, next);
            } else {
                next(err)
            }
        });
    };
};
Step 8: Create a folder named controllers in your project and then create a file named “users.controller.js” in it.
//Create User (POST request)const view = require("../view/responseDTO"); // import response Data transfer object const mongoose = require("mongoose"); // User Create Profile module.exports.create = function(req, res, next) { try { var user = mongoose.model("users"); var doc = new user(req.body); doc.save(function(err) { if (err) { view._view( { code: 400, flag: message._flag.params.flag, message: errorHandler.getErrorMessage(err) }, res, next); } else { view._view( { code: 200, flag: message._dataGetSuccess, message: "User Created Successfully !!" }, res, next); } }); } catch (err) { view._view( { code: 500, flag: message._flag.database.flag, message: err.message }, res, next); } };
The response of POST request:

// Login User (PUT request)module.exports.login = function(req, res, next) { try{ var user = mongoose.model("users"); user.findOne({ email: req.body.email, password: req.body.password },function(err, doc) { if (err) { view._view( { code: 400, flag: message._flag.params.flag, message: errorHandler.getErrorMessage(err) }, res, next); } else { res.userinfo = doc; next(); } }); }catch(err){ view._view({ code: 500, flag: message._flag.database.flag, message: err.message }, res, next); } }; // Get Profile module.exports.getProfile = function(req, res, next) { try { view._view({ code: 200, flag: message._dataGetSuccess, message: message._dataGetSuccess, token: res.token, userInfo: { firstName: res.userinfo.firstName, lastName: res.userinfo.lastName, email: res.userinfo.email, password: res.userinfo.password } }, res, next ); } catch (err) { view._view({ code: 500, flag: message._flag.database.flag, message: err.message }, res, next); } };
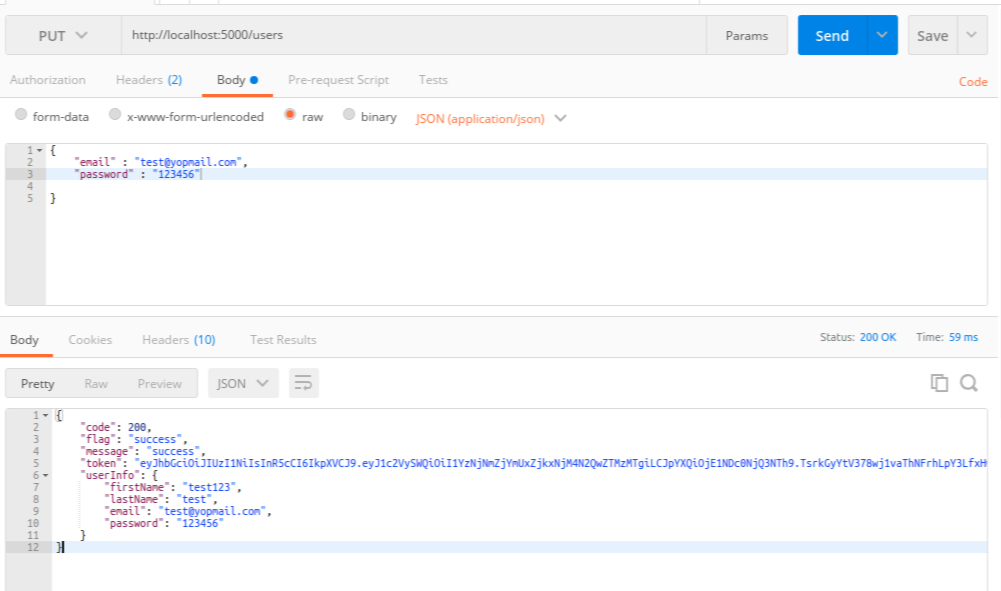
The response of PUT request:

// User Update Profile (PATCH request)
module.exports.update = function(req, res, next) {
 try {
   var users = mongoose.model("users");
   users.updateOne({_id: mongoose.Types.ObjectId(res.userId)}, req.body, function(err) {
    if (err) {
      view._view({
       code: 400,
       flag: message._flag.params.flag,
       message: errorHandler.getErrorMessage(err)
      }, res, next );
    } else {
      view._view({
       code: 200,
       flag: message._dataGetSuccess,
       message:
       res.message == void 0 ? message._dataGetSuccess : res.message
      }, res, next);
    }
   });
 } catch (err) {
   view._view({
     code: 500,
     message: err.message
    }, res, next );
  }
};
The response of Patch request:

Step 9: Create the Authorization module for Secure API and a folder named ‘auth’:
'use strict';
var mongoose = require('mongoose');
module.exports = {
  isAuthenticated: function (req, res, next) {
    var authorization = mongoose.model('authorizations');
    let authKey= req.headers['authorization-key'].split(' ');
    if (authKey[0] !== 'Bearer') {
       view._view({
         code: 401,
         flag: message._flag.authorization.flag,
         message: message._flag.authorization.msg
     }, res, next)
    } else {
      authorization.findOne({
       authorizationkey: authKey[1],
       contentType: { $regex: req.headers['content-type'], $options: 'i' }
      }, function (err, doc) {
           if (err) {
              view._view({
                code: 400,
                flag: message._flag.params.flag,
                message: errorHandler.getErrorMessage(err)
             }, res, next);
          } else if (doc != null) {
             next();
          } else {
            view._view({
              code: 401,
              flag: message._flag.authorization.flag,
              message: message._flag.authorization.msg
            }, res, next);
         }
     });
   }
 }
};
In the above method (isAuthenticated), we are checking the Bearer token which is also known as Token authentication. We are using this for login and it generates a token automatically on login i.e. PUT request.
// Response DTO (Data transfer object) File
"use strict";
module.exports = {
 _view: function(req, res, next) {
   switch (req.code) {
     case 200:
       res.status(200).send(req);
       break;
     case 400:
       res.status(400).send(req);
       break;
     case 401:
       res.status(401).send(req);;
       break;
     case 402:
       res.status(402).send(req);
       break;
     case 404:
       res.status(404).send(req);
       break;
     case 422:
       res.status(422).send(req);
       break;
     case 500:
       res.status(500).send(req);
       break;
   }
 }
};
/* Error Codes
200 Success
400 Bad Request
401 Unauthorized
404 Not Found
402 Payment Required
500 Internal Server Error
422 Content Type
*/
Need assistance from professionals to create a secure REST API in Node.js? Reach out to us and take your REST API development to the next level today!


